Understanding the Wood Feature Wall Concept
Definition and Benefits of Wood Feature Wall
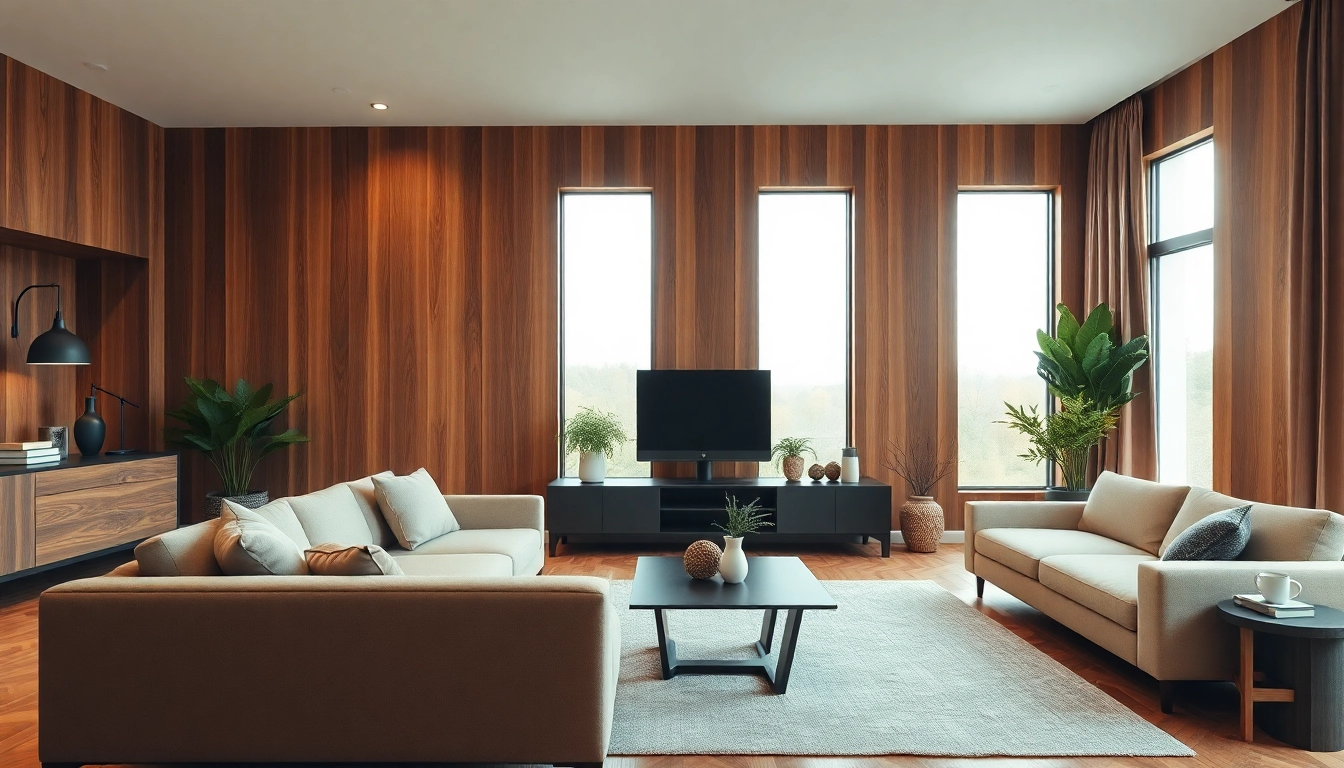
A wood feature wall is an architectural element that uses timber to create a visually striking focal point in a space. This design concept involves covering a wall in whole or part with wood planks or panels, which adds texture, warmth, and elegance to both residential and commercial interiors. The benefits of incorporating a wood feature wall are multifaceted. Not only does it enhance the aesthetics of a room, but it also contributes to acoustics by absorbing sound, making spaces feel more intimate and less echoey. Furthermore, wood has natural insulating properties, which can aid in maintaining temperature and comfort levels in your home.
Different Wood Types for Feature Walls
When it comes to selecting wood for your feature wall, the options are extensive. Here are some popular wood types used in feature wall designs:
- Oak: Known for its durability and rich grain patterns, oak is a timeless choice that adds sophistication to any room.
- Pine: A cost-effective option, pine is lighter and easy to work with, providing a casual, rustic vibe.
- Walnut: Renowned for its deep hues and smooth texture, walnut can add a luxurious touch to more upscale designs.
- Maple: With a subtle grain and uniform color, maple is great for contemporary designs that prioritize a minimalist look.
- Cedar: Naturally resistant to decay and insects, cedar is perfect for adding a hint of outdoorsy charm indoors.
Ideal Spaces for Wood Feature Wall Implementation
Wood feature walls can transform a variety of spaces. Here are some ideal locations for their implementation:
- Living Rooms: A wood feature wall can serve as a backdrop for your entertainment center or a cozy reading nook.
- Bedrooms: Installing a wood feature wall behind the bed can create a serene sanctuary, enhancing the overall ambiance.
- Offices: A warm wood finish can make an office space feel more inviting and can help to reduce stress, fostering creativity.
- Restaurants and Cafés: Many establishments utilize wood feature walls to create an inviting and warm atmosphere for customers.
- Hallways: Often overlooked, hallways can benefit from the visual interest provided by a wood feature wall, especially in more expansive homes.
Planning Your Wood Feature Wall Design
Choosing the Right Location
When planning your wood feature wall, location is crucial. Consider the purpose of the space and how you want to interact with it. A high-traffic area might benefit from a durable wood type, while more intimate spaces like bedrooms can handle softer woods. Additionally, think about visibility — positioning your feature wall where it can be admired from different angles will maximize its impact.
Measuring and Layout Considerations
Before diving into installation, accurate measurements are essential. Start by measuring the height and width of your designated wall. This not only helps you calculate the amount of wood required but also determines how many panels or planks will fit. Lay out your options on a graph or design software to visualize how the finished product will look. Don’t forget to consider any obstacles like windows, doors, or light switches that might complicate the layout.
Color Schemes that Complement Wood Feature Wall
Choosing the right color scheme is vital for enhancing your wood feature wall. Natural wood tones pair beautifully with soft neutrals such as whites, beiges, and pastels, allowing the wood to be the focal point. For a bolder look, consider pairing darker woods with deeper colors like navy or charcoal, adding depth and drama to the room.
Accent pieces can also elevate the overall aesthetic. For example, pairing a warm maple wood with muted green furnishings can create a cohesive nature-inspired design. Experimenting with contrasting colors can yield stunning results, so don’t hesitate to try out different combinations before settling on a color scheme that resonates with your style.
Creating Your Wood Feature Wall
Tools and Materials Needed
Creating a wood feature wall involves a range of tools and materials. Here’s a comprehensive list to ensure you’re well-prepared:
- Wood panels or planks of your choice
- Measuring tape
- Level
- Pencil for marking
- Cutting saw (hand saw or power saw)
- Nail gun or hammer and nails
- Adhesive (if necessary)
- Sandpaper or a sander
- Wood stain or sealant (optional)
Step-by-Step Installation Process
Follow these steps for a successful wood feature wall installation:
- Prepare the Wall: Ensure the area is clean, dry, and free from any wall coverings.
- Measure and Mark: Use your measuring tape to mark the desired height and width. Draw a level line across the wall at the height of your first row of panels.
- Cut Wood Panels: If necessary, cut the wood panels to fit. Smooth any rough edges with sandpaper.
- Install the First Row: Begin at the bottom and place the first piece of wood against your marked line, ensuring it’s level. Use the nail gun or hammer to secure it in place.
- Add Additional Rows: Continue stacking the panels, making sure they are aligned. Use adhesive or nails as needed for added security.
- Finishing Touches: If desired, apply wood stain or sealant to enhance the appearance and protect the wood from damage.
Common Mistakes to Avoid
While installing a wood feature wall may seem straightforward, there are several common pitfalls to keep in mind:
- Neglecting the Walls: Ensure that the wall is adequately addressed and any old paint or wallpaper is removed before installation.
- Improper Measurements: Double-check your measurements thoroughly to avoid costly mistakes in cutting panels.
- Drying Time for Adhesives: If using adhesive, allow the necessary drying time before putting weight against the panels.
- Overlooking Acclimation: Let wooden panels acclimate to the room’s temperature and humidity for at least 48 hours before installation to prevent warping.
Enhancing Your Wood Feature Wall Aesthetics
Decorative Accents for Wood Feature Wall
Once you’ve successfully installed your wood feature wall, it’s time to think about decorative accents. These can include:
- Artwork: Hang framed art or photographs that resonate with your personal style.
- Shelves: Add floating shelves for books and knick-knacks that complement the wood.
- Textiles: Incorporate fabric elements such as throw pillows or blankets nearby to soften the look.
- Mirrors: A decorative mirror can add depth and reflect light, enhancing the overall appearance.
Lighting Ideas to Highlight Wood Feature Wall
Lighting plays a crucial role in showcasing your wood feature wall. Consider these lighting ideas:
- Recessed Lighting: Install recessed lights above the feature wall to create a dramatic effect.
- Wall Wash Lighting: Use wall-mounted lights that wash the surface of the wood, highlighting its texture and grain.
- Accent Lamps: Place lamps nearby to create warm, inviting ambiance that enhances the color of the wood.
- LED Strip Lights: Consider using LED strips along the edges of the wall for a modern touch.
Seasonal Decorations that Fit Wood Feature Wall
Adapting your wood feature wall with seasonal decorations can keep your space feeling fresh and lively. Here are some ideas:
- Spring: Incorporate floral arrangements or pastel-colored accents that pop against the wood.
- Summer: Use nautical elements or vibrant colors to evoke a beachy feel.
- Autumn: Utilize warm tones like oranges, browns, and reds with themed decor like pumpkins or harvest elements.
- Winter: Add cozy touches with metallics and soft textiles for a warm look during colder months.
Maintaining Your Wood Feature Wall
Cleaning and Care Tips
To keep your wood feature wall looking pristine, regular maintenance is essential. Here are some cleaning and care tips:
- Dusting: Use a soft cloth or duster to remove dust from the wood surface regularly.
- Wipe Down: For deeper cleanings, dampen a cloth with water and a mild cleaning solution, gently wiping the panels.
- Avoid Harsh Chemicals: Stay away from abrasive cleaners that can damage or discolor the wood.
Repairing Common Damages
Over time, even the most well-maintained wood feature wall may encounter some issues. Here’s how to address common damages:
- Scratches: Light scratches can often be repaired with a wood filler or furniture marker that matches the wood color.
- Dents: For dents, try applying moisture and heat using a damp cloth and an iron to raise the wood back to its original state.
- Discoloration: If discoloration occurs, you may need to sand down those areas and re-stain or apply a sealant.
Long-term Upkeep of Wood Feature Wall
Maintaining the integrity of your wood feature wall over the long term involves consistent care and attention. Here’s how to ensure longevity:
- Regular Inspections: Periodically check for signs of wear or damage, especially in areas exposed to sunlight or moisture.
- Reapply Finish: Depending on the type of wood and initial finish used, you may need to reapply wood oil or stain every few years to maintain its appearance.
- Humidity Control: Maintain consistent indoor humidity levels, as excessive moisture can lead to warping or mold.